This past winter, I wanted to make cherry bread. I had a few ideas brewing in my mind, and I started out with a cherry quick bread recipe that was absolutely delicious. The streusel topping was so good, but I still wanted to make a yeast bread that wasn’t quite so sweet and was less of a dessert. Then life happened, and I forgot about it until this weekend when we were buying more dried cherries at the store and the wee ones asked me when I was going to make more cherry bread.
Well, I can’t let them down, can I?

The good news is that I have an amazing challah recipe that I adore making. It’s easy enough that I can make it on a weekday, as well as being versatile to where it can accept other ingredients. I loved the idea of the challah with the chocolate and cherries because I wanted a bread that would be moist and slightly sweet, more so than a sandwich type bread like what I make for cinnamon raisin bread – another recipe I need to share!
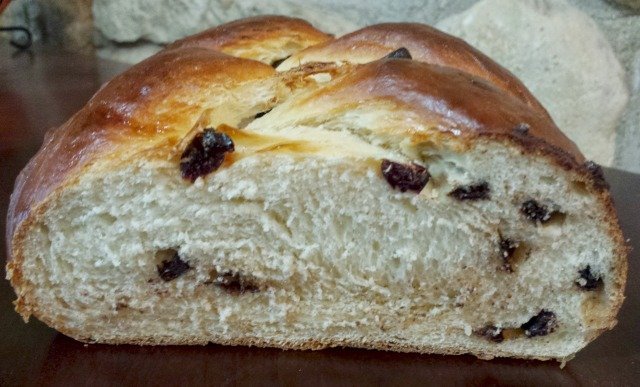
Whenever you make bread, you should always let it cool before slicing into it. If you cut it while it’s still warm, the escaping steam lets the moisture out of the bread, which means that by the second day, it will be much drier than you want. But breads like this that smell so amazing coming out of the oven? The breads that are so soft and chewy and oh the melty chocolate chips? It’s really, really hard to resist. I do my best…
I use grapeseed oil because it is a flavorless oil. It’s one of my favorite oils for cooking since it also has a high smoke point. If you don’t have any, you can use another oil like canola oil, but my preference is grapeseed. When the weather is nicer and it’s cherry season, you could definitely make this with fresh cherries, as well. I would pit the cherries and chop them before adding them, knowing that the moisture from the fresh cherries will also mean I’ll need to add more flour to my dough to ensure it isn’t too wet. As always, when I bake with chocolate, I use the highest quality chocolate that I can. You could chop a block of chocolate, but I have great Callebaut chocolate chips that I love using.
As with all my breads (except my cheating no knead bread), I made this using my stand mixer. If you don’t have one and are making it by hand, be sure to whisk the wet ingredients well – ensuring the eggs are well beaten. Once you’ve mixed in the flour, turn it out onto a floured board and knead it for 5 to 7 minutes, then follow the remaining directions.
In our house, the wee ones have a theory that the more chocolate chips, the better. Having seen the chocolate chip cookies they’ve made at my parents’ house, I can see they’ve actually tested this theory. Cookie dough is fairly forgiving, but we want to taste this amazing challah, not just a smorgasbord of chocolate and cherry. Plus, the bread dough can only hold so much of the extra ingredients, so this isn’t the place to add extra yumminess into your dough, much to the wee ones’ chagrin.
Chocolate Cherry Challah
Ingredients:
1 c hot water (110-115 degrees)
1 T yeast
2 t salt
3 eggs, divided
1/4 c honey
1/4 c grapeseed oil
4 c flour
1 c dried cherries
3/4 c chocolate chips
Directions:
In your stand mixer bowl, add the water, yeast, salt, 2 eggs, honey, and grapeseed oil. Stir on low speed using your dough hook, then move up to 3 and mix for one to two minutes to ensure that the wet ingredients are fully incorporated together. Add half the flour and mix on low speed until incorporated. Add the rest of the flour and stir on low until combined then turn it up to 4 or 5 and let the dough work for five minutes. It will still be sticky and wet, much more so than a sandwich bread dough.
Remove the dough from your bowl and lightly oil it with more grapeseed oil – you shouldn’t need more than a teaspoon. Return the dough to the bowl and cover with a damp kitchen towel. Let rise in a warm spot for one to one and a half hours when it has doubled in size.
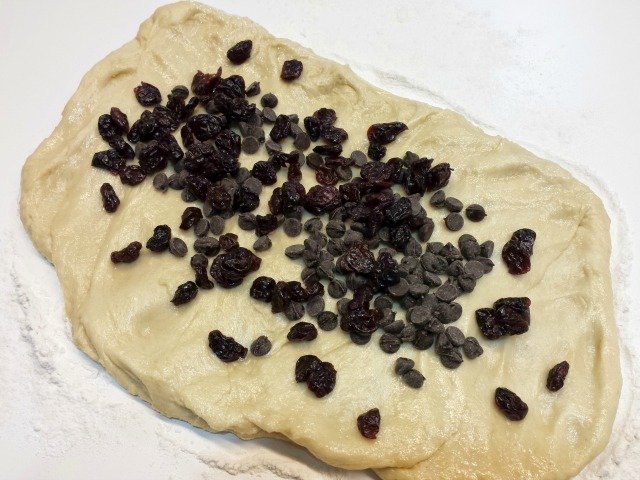
Once the dough has risen the first time, turn it out onto a floured surface and flatten it to about an inch thick, and spread the chocolate and cherries atop the dough.
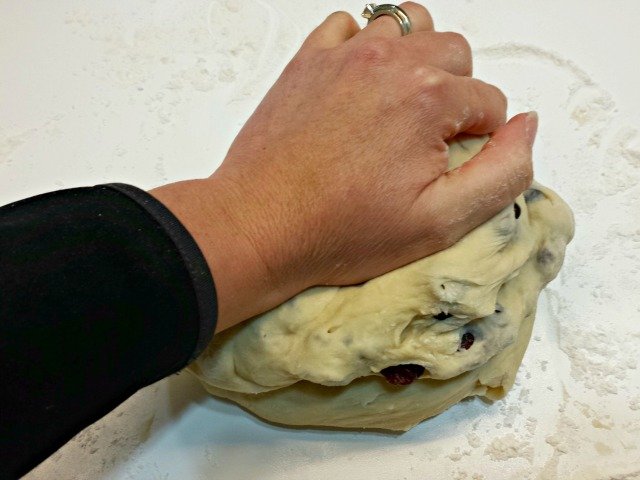
Fold the dough over and knead for a minute or so until the cherries and chocolate are distributed throughout the dough. Divide the dough into three equal pieces. Let it rest for five minutes so the gluten strands have a bit of time to relax, which will make forming the braid stands easier.
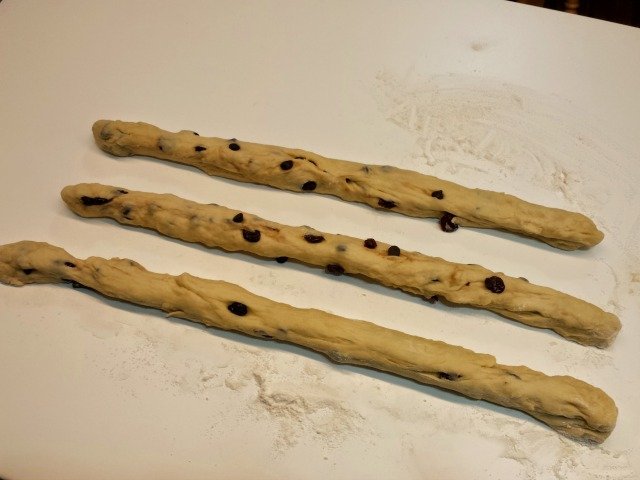
Once the dough has rested, roll each section into a rope about an inch in diameter. Some of the chocolate or cherries may fall out of the dough. Don’t worry about it. Simply pick them up and push them back into the dough.
Lay the three ropes of dough side by side, and pinch together the ends on one side.

Proceed to braid the dough ropes together, making them a wider, thicker braid, rather than a long, skinny bread. The easiest way to do this is to have each rope go to almost 90 degrees from the main braid as you move through the strands.
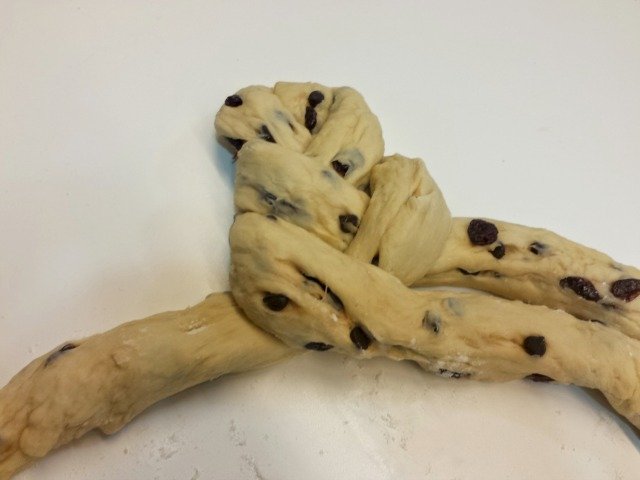
When you reach the end, tuck the ends under and place on a parchment covered cookie sheet. Cover the dough again with a kitchen towel and let it rise for another house.

Preheat your oven to Prepare your egg wash – use a fork to beat together your last egg and a tablespoon of water. Brush the egg wash over your dough. Note that you will not use anywhere near all the egg wash.

Bake in your 375 degree oven for 30 minutes, until it’s golden brown and sounds hollow when you tap it. Let it cool for a half hour before you slice it to ensure it stays fresh and moist. If you can wait.


Chocolate Cherry Challah
If you've never made challah at home before, this is the one to make. It has the traditional flavors of challah with the added mild sweetness of cherry and chocolate. It's surprisingly easy to make and tastes amazing!
Ingredients
- 1 c hot water (110-115 degrees)
- 1 T yeast
- 2 t salt
- 3 eggs, divided
- 1/4 c honey
- 1/4 c oil
- 4 c flour
- 1 c dried cherries
- 3/4 c chocolate chips
Instructions
- In your stand mixer bowl, add the water, yeast, salt, 2 eggs, honey, and oil. Stir on low speed using your dough hook, then move up to 3 and mix for one to two minutes to ensure that the wet ingredients are fully incorporated together. Add half the flour and mix on low speed until incorporated. Add the rest of the flour and stir on low until combined then turn it up to 4 or 5 and let the dough work for five minutes. It will still be sticky and wet, much more so than a sandwich bread dough.
- Remove the dough from your bowl and lightly oil it with more oil - you shouldn't need more than a teaspoon. Return the dough to the bowl and cover with a damp kitchen towel. Let rise in a warm spot for one to one and a half hours when it has doubled in size.
- Once the dough has risen the first time, turn it out onto a floured surface and flatten it to about an inch thick. Spread the chocolate and cherries atop the dough, then fold the dough over and knead for a minute or so until the cherries and chocolate are distributed throughout the dough. Divide the dough into three equal pieces. Let it rest for five minutes so the gluten strands have a bit of time to relax, which will make forming the braid stands easier.
- Once the dough has rested, roll each section into a rope about an inch in diameter. Some of the chocolate or cherries may fall out of the dough. Don't worry about it. Simply pick them up and push them back into the dough. Lay the three ropes of dough side by side, and pinch together the ends on one side. Proceed to braid the dough ropes together, making them a wider, thicker braid, rather than a long, skinny bread. The easiest way to do this is to have each rope go to almost 90 degrees from the main braid as you move through the strands. When you reach the end, tuck the ends under and place on a parchment covered cookie sheet. Cover the dough again with a kitchen towel and let it rise for another hour.
- Preheat your oven to Prepare your egg wash - use a fork to beat together your last egg and a tablespoon of water. Brush the egg wash over your dough. Note that you will not use anywhere near all the egg wash. Bake in your 375 degree oven for 30 minutes, until it's golden brown and sounds hollow when you tap it. Let it cool for a half hour before you slice it to ensure it stays fresh and moist. If you can wait.
Notes
- When the weather is nicer and it's cherry season, you could definitely make this with fresh cherries, as well. Pit the cherries and chop them before adding, knowing that the moisture from the fresh cherries will also mean you need to add more flour to the dough to ensure it isn't too wet.
- This recipe uses a stand mixer. If you don't have one and are making it by hand, be sure to whisk the wet ingredients well - ensuring the eggs are well beaten. Once you've mixed in the flour, turn it out onto a floured board and knead it for 5 to 7 minutes, then follow the remaining directions.
Recommended Products
As an Amazon Associate and member of other affiliate programs, I earn a commission from qualifying purchases.


Nutrition Information:
Yield: 15 Serving Size: 1 sliceAmount Per Serving: Calories: 266Total Fat: 8gSaturated Fat: 2gTrans Fat: 0gUnsaturated Fat: 5gCholesterol: 37mgSodium: 329mgCarbohydrates: 45gFiber: 2gSugar: 17gProtein: 6g
This site uses an outside source to provide nutrition. If you need exact details, please calculate yourself.
[…] Chocolate cherry challah […]