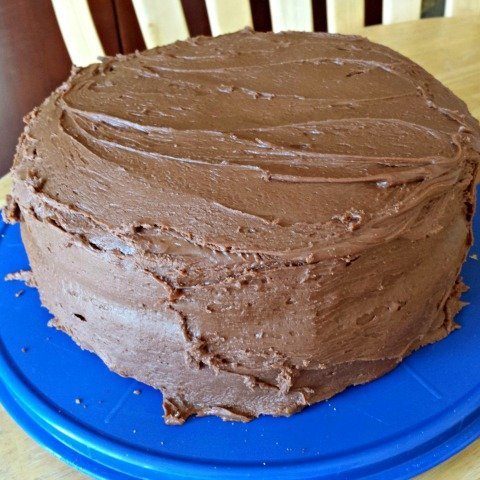
A dear friend of mine turned *cough* years old last week. When we made plans for our families to get together for dinner to celebrate, I insisted I would bring her a cake. Though she started out with an “I don’t care” when I asked her what kind she wanted, she decided she wanted a marble cake, figuring that would best please her children (yes, she’s a mother through and through). So of course I was happy to make it for her, with chocolate frosting to boot.

It was a great cake, and I chose to make it dairy free not just because Little Miss has a dairy allergy but also because the daughter of another friend who would be there also has an issue with dairy. Though the girl has given up dessert for Lent, we moms made a papal decision that she should at least try this since her mom is still learning how to handle cooking and baking without dairy. When she came back for a second piece, I knew this cake was a success.
Though I used coconut oil and rice milk when I made it, you can sub out butter and regular milk one for one if you don’t have a dairy restriction in your family.
The cake is moist and always so fun when you cut into what looks like a “plain” cake and discover the fun of the marble inside. It comes together quickly and requires no special equipment. The next time you need to whip something up, this just might be the cake for you! The recipe makes two 9 inch round cakes so that you can layer them. Just be sure to even out the tops before you stack them so that they stay put – a lesson I learned the hard way when making my husband’s birthday cake years ago.
Moist Marble Cake
Ingredients:
10 T coconut oil
2 c sugar
3 c flour
1 T baking powder
1 t salt
1 c rice milk
1/4 c mayonnaise
2 t vanilla bean paste
4 eggs, at room temperature
4 oz chocolate chips
1 t espresso or java extract
Directions:
Preheat the oven to 350°. Prepare two 9-by-2-inch round cake pans and line them with parchment paper. To help the parchment stick to the bottom of the cake pans, lightly grease the pan before laying them inside then grease the parchment paper.
In a medium bowl, add the coconut oil and granulated sugar. Beat together until lightened in color and texture, 2-3 minutes. Add in the eggs one at a time, beating between each addition and scraping the bowl as needed to ensure everything is equally incorporated.
In your liquid cup measure, add the milk, vanilla bean paste, and mayonnaise and whisk to combine. In another bowl, add stir together the flour, baking powder and salt. Add the one-third of the dry ingredients and mix, then add half the liquid, continuing to add alternating the wet and dry, mixing thoroughly between each addition.
In a heavy saucepan, carefully melt your chocolate on low heat, stirring frequently to ensure it doesn’t burn. Remove from the heat just before all the chocolate has melted. The residual heat will melt the remaining chocolate.
Remove two cups of batter and place in the bowl that had contained your flour. Add the melted chocolate and stir with a spatula, adding the espresso and gently stirring until fully mixed.
Add all the vanilla batter to the cake pans, using a scale to ensure that you evenly distribute the batter between the two cake pans. Dollop the chocolate batter atop the vanilla batter using the same method.

Using a small spatula, swirl together the chocolate and vanilla.
Bake the cakes in your 350 degree oven for 35 to 40 minutes until your tester comes out with just a few crumbs. Cool your cakes in the pan for 10 minutes, then run a knife carefully around the edges and flip out onto a cooling rack. Let cool thoroughly.
Once the cakes are cooled, use a serrated knife to carefully cut off the top of one cake to ensure it is flat. Place that layer upside down onto your serving dish that is lined with overlapping pieces of parchment paper so that your cake plate stays neat once you’ve decorated it.

Add frosting to the center of the layer and carefully spread to the edges. Add the second cake right side up in the middle of the layer, carefully turning if necessary to ensure it is as even as possible.
Again, add frosting to the center of your cake and push the frosting to the edges in a circular motion from the center. Add more frosting as needed and continue pushing it out. It will start to go over the edges. Let it do so, and continue to push from the center. Only once the frosting has already started to move down the sides of the cake should you gently smooth the frosting on the sides. This will help prevent cake crumbs from becoming embedded in your cake.

The cake will keep (frosted) in a sealed container on your counter for 2-3 days.
To make chocolate frosting, melt 6 tablespoons of coconut oil (or butter) in a saucepan along with an equal amount of rice milk and 1/3 cup of cocoa powder. Once it is melted, add 2 ounces of dark chocolate, either chopped or chips. Stir off the heat until the chocolate melts. Add to a mixing bowl and add 4 1/2 cups powdered sugar. Stir together slowly until the powdered sugar is mostly incorporated then beat until fluffy. Add more powdered sugar if you like your frosting thicker or 1 teaspoon of rice milk to thin it slightly.

Homemade Marble Cake
This is a delicious and moist marble cake that combines the best of chocolate cakes and yellow cakes. It's a perfect (and simple) homemade cake!
Ingredients
- 10 T butter
- 2 c sugar
- 3 c flour
- 1 T baking powder
- 1 t salt
- 1 c milk
- 1/4 c mayonnaise
- 2 t vanilla bean paste
- 4 eggs, at room temperature
- 4 oz chocolate chips
- 1 t espresso or java extract
Instructions
- Preheat the oven to 350°. Prepare two 9-by-2-inch round cake pans and line them with parchment paper. To help the parchment stick to the bottom of the cake pans, lightly grease the pan before laying them inside then grease the parchment paper.
- In a medium bowl, add the butter and granulated sugar. Beat together until lightened in color and texture, 2-3 minutes. Add in the eggs one at a time, beating between each addition and scraping the bowl as needed to ensure everything is equally incorporated.
- In your liquid cup measure, add the milk, vanilla bean paste, and mayonnaise and whisk to combine. In another bowl, add stir together the flour, baking powder and salt. Add the one-third of the dry ingredients and mix, then add half the liquid, continuing to add alternating the wet and dry, mixing thoroughly between each addition.
- In a heavy saucepan, carefully melt your chocolate on low heat, stirring frequently to ensure it doesn't burn. Remove from the heat just before all the chocolate has melted. The residual heat will melt the remaining chocolate.
- Remove two cups of batter and place in the bowl that had contained your flour. Add the melted chocolate and stir with a spatula, adding the espresso and gently stirring until fully mixed.
- Add all the vanilla batter to the cake pans, using a scale to ensure that you evenly distribute the batter between the two cake pans. Dollop the chocolate batter atop the vanilla batter using the same method. Using a small spatula, swirl together the chocolate and vanilla.
- Bake the cakes in your 350 degree oven for 35 to 40 minutes until your tester comes out with just a few crumbs. Cool your cakes in the pan for 10 minutes, then run a knife carefully around the edges and flip out onto a cooling rack. Let cool thoroughly.
- Once the cakes are cooled, use a serrated knife to carefully cut off the top of one cake to ensure it is flat. Place that layer upside down onto your serving dish that is lined with overlapping pieces of parchment paper so that your cake plate stays neat once you've decorated it. Add frosting to the center of the layer and carefully spread to the edges. Add the second cake right side up in the middle of the layer, carefully turning if necessary to ensure it is as even as possible.
- Again, add frosting to the center of your cake and push the frosting to the edges in a circular motion from the center. Add more frosting as needed and continue pushing it out. It will start to go over the edges. Let it do so, and continue to push from the center. Only once the frosting has already started to move down the sides of the cake should you gently smooth the frosting on the sides. This will help prevent cake crumbs from becoming embedded in your cake.
Notes
- The cake will keep (frosted) in a sealed container on your counter for 2-3 days.
- To make this cake is made dairy free, substitute regular milk and butter one to one for rice milk and coconut oil.
- To make chocolate frosting, melt 6 tablespoons of coconut oil (or butter) in a saucepan along with an equal amount of milk and 1/3 cup of cocoa powder. Once it is melted, add 2 ounces of dark chocolate, either chopped or chips. Stir off the heat until the chocolate melts. Add to a mixing bowl and add 4 1/2 cups powdered sugar. Stir together slowly until the powdered sugar is mostly incorporated then beat until fluffy. Add more powdered sugar if you like your frosting thicker or 1 teaspoon of milk to thin it slightly.
Recommended Products
As an Amazon Associate and member of other affiliate programs, I earn a commission from qualifying purchases.


Nutrition Information:
Yield: 12 Serving Size: 1 sliceAmount Per Serving: Calories: 441Total Fat: 18gSaturated Fat: 9gTrans Fat: 0gUnsaturated Fat: 8gCholesterol: 91mgSodium: 457mgCarbohydrates: 65gFiber: 1gSugar: 39gProtein: 7g
This site uses an outside source to provide nutrition. If you need exact details, please calculate yourself.
[…] Marble cake […]